
Saturday, August 31, 2013
crocheted doll
I was asked by a good friend a few months ago to make a Lalaloopsy doll for her daughter who just LOVES the toys. I had no idea how to do so, honestly I put it off. This week I decided to take the plunge. I found the pattern on Ravelry. Oopsy doll. I found most of the pattern very good and some I would do different. Such as the head/hair/face, would all be done at once rather than all separate. I have also decided I'm going to have to make more dolls. There are so many different dolls that can be made.

Saturday, June 29, 2013

Tuesday, June 25, 2013
Summer V sandals
As promised some fun Summer barefoot sandals. These fit adult size feet, in the photo my daughter (who wears a size 8 1/2 women shoe) decided it would make more sense to wear it on her 3rd toe. Have you ever tried to argue with a 13 year old? I decided it wasn't worth the argument because they still looked cute. Once you get started I'm sure you can probably make them in any size. Have fun and like always please let me know if there are any questions.

Flower
Summertime barefoot sandals

Made by Hooked2yarn
Aunt
Lydia Bamboo Crochet Thread #3 and D hook.
Stitches to know-
SL ST= slip stitch TBC=treble
crochet
SC =single crochet
Beg V=Chain 4, DC in same
space V=DC, Ch1, DC same space
*Vs are worked in the ch1 space
throughout the pattern*
Row
2) SL st into the big loop, Beg V. Turn
Row
3) SL st into the ch1 space from previous Beg V (from here out this is how you
will work the turn) Beg V, V. Turn (2 Vs worked)
Row
4) Sl st into previous Ch1 space. Beg V,
V in space between previous V, V in last V.
Turn (3 Vs worked)
Row
5) Sl st into previous ch1 space. Beg V,
V in the ch1 space, V in next ch 1 space.
Turn (3Vs worked)
Row
6) Sl st into previous ch1 space. Beg V,
V in same space as Beg V, V in next ch1 space, 2V in last ch1 space. Turn (5Vs worked)
Row
7) Sl st into previous ch1 space. Beg V,
V in each of the ch1 spaces across. Turn
(5 Vs worked)
Row
8) Sl st into previous ch1 space. Beg V,
V in the same space as Beg V, V in each ch1 space, 2Vs in the last ch1
space. Turn (7Vs worked)
Row
9) Sl st into previous ch1 space. Beg V,
V in each of the ch 1 spaces across.
Turn (7Vs worked)
Row
10) Sl st into the previous ch1
space. Beg V, V in same space, V in each
of the ch1 space. 2Vs in the last ch1
space. Turn (9Vs worked)
Row
11) Sl st into previous ch1 space. Beg
V, V in each ch1 spaces across. Do NOT turn (9Vs worked)
Row
12 turn triangle so you are working along the side. Sc, ch3 sc around the last DC just made. Sc, ch3, sc around each DC around. When you get to the toe loop, I pulled it
down so I could sc, ch3, sc in the same space and around the other side. 3 Sides completed.
After
3 sides are completed chain the number you would like, I had mine tie in the
front so I chained 121 and fasten off.
Join with sc in the same ch1 space you ended with. Sc, ch3, sc in each ch1 space, ending w/
chains for the other side, again I chained 121.
Fasten off.
Ch
4, join to 1st ch to make a loop or do a magic loop
*Ch
4, 3tbc, ch4, sl st into ring,* Repeat 4 more times for a total of 5 flower
petals. Sew onto sandal.
~Pattern
written by Hooked2yarn, please do not present this pattern as your own. You do have permission, however to sell any
product made from this pattern~
Tuesday, June 11, 2013
headband
I also made this a while back. I LOVE it. I personally wear glasses so wearing headbands are difficult for me because they either hurt my ears or my glasses get in the way & I dont have the problem w/ these. The headband can be worn w/ the button under or on top. I can put a bigger or smaller button & it can be tightened if needbe.


Barefoot Sandals
Here is another pair of barefoot sandals, however these ones I made up. I have not decided if I am going to post my pattern here or if I am going to sale it.


Monday, June 10, 2013

New pattern
I have posted my newest pattern on Ravelry. http://www.ravelry.com/patterns/library/wear-it-your-way. Check it out!!


Monday, May 27, 2013
Teenage girls
It is becoming a challenge to raise these pre-teen/teenage girls. I remember being 12 & 13, hanging out with my friends and on occasion playing w/ my Barbies. Yesterday my daughter told me about a girl who is 11 and having sex. That was the furthest thing from my mind at that age. What do these kids think sometimes? I used to think it was the parents. Where were they when this was going on? Don't they know what their daughter is doing? I have quickly learned that is not always the case. My husband and I are very loving and try to be involved and interested in what they our kids do. However I recently found out my 12 yr old tried cutting. She did decide it didn't work for her...whew! Where was I? In the house with her, at work, taking the girls to school, telling them everyday how much I loved them and how beautiful they are. I did read a bit of her journal and found her to be very confused, thinking of death, and then life.
The people she was associating herself with were not good people. Why was she their friend? She thinks she can save the world. If she is not their friend then who will be and they might make bad friends and do bad things, but since she is good she could help them be good.
Now that school is over for the summer I hope I can get her back on track. To start with she is going to visit family for about 2 weeks or so. Last weekend while hubby was gone us girls had a no electronics weekend. No cell phones, I did however let them take their IPods when we went on our long drives to take hubby to his function and pick him up since it was about an 1hr 1/2 away. I think it was a great things. The girls and I watched movies, talked and had a pretty good time. By today my 12 yr old was talking and hugging me.
We will see what happens next
Saturday, May 18, 2013
To Instagram or not To Instagram...
Recently my 13 yr old daughter has asked if she chould have an Instagram. Ive been trying to research this & have decided that if I got an Instagram for the family we could all use it. Sounds good right? Now to talk my husband into it. Wish me luck.
Thursday, May 16, 2013
V's and Clusters 12 in square
I am in a square swap group on Ravelry. I have been in it for 3 years now and LOVE it. This year I have made a lot of squares from my own little mind. Here is my latest. The colors were bright green and grey because she is doing a zombie theme blanket for her 16 yr old son. I cant wait to see it all done. So this is what I came up with and thought I would share the pattern. Please let me know if you run into any problems or have any questions. Have fun!!

V stitch-dc,
ch 1, dc
MC
Rnd 1) Ch 4 join to make a loop
Rnd 2) 8 sc inside loop, join with sl into first sc. (8sc)
Rnd 3) Ch 1 (does not count) 2hdc in each st around. Join w/ 1st hdc (16 hdc)
CC
Rnd 7) Repeat round 5, ending with 36 clusters.
V’s and Clusters
12
inch square

Gauge – 6 rows 11 dc = 4x4 worked in
worsted weight such as Red Heart
Beg Cluster-pull
up a loop, YO insert hook into same stitch, YO pull through YO pull through 2
loops, YO insert hook into same stitch, YO pull through YO pull through 2
loops, YO pull through last two loops, ch1.
Cluster-YO
insert hook into next stitch indicated, YO pull through, YO pull through 2
loops, YO insert hook into same stitch, YO pull through, YO pull through 2
loops, YO insert hook into same stitch, YO pull through, YO pull through 2 loops, YO pull through 4 loops on hook, ch1. http://www.dummies.com/how-to/content/how-to-crochet-a-cluster-stitch.html
MC
Rnd 1) Ch 4 join to make a loop
Rnd 2) 8 sc inside loop, join with sl into first sc. (8sc)
Rnd 3) Ch 1 (does not count) 2hdc in each st around. Join w/ 1st hdc (16 hdc)
From here alternate rounds between
V’s and Cluster’s changing colors with each new round.
Rnd 4) This is the first
corner. Ch 4 (counts as dc, ch1) dc, ch
1, V, * skip next stitch, V, skip next stitch V, skip next stitch, V, ch 1, V *
repeat between * 3 more times. Join to 3rd
chain in beg. Fasten off. (16 V’s)
CC
Rnd 5) Join with CC in any corner
(between V’s). ch1, pull up loop for Beg
cluster, ch2, Cluster in same space.
*Cluster in ch 1 space of V stitches to next corner, Cluster, ch2,
Cluster in corner space* repeat 3 more times.
Join to ch1 of Cluster. Fasten
off (24 clusters)
MC
Rnd 6) Join with MC in any corner
space, ch 4 (counts as dc, ch1) dc, ch1, V, *V stitch in ch 1 space between
clusters to the corner. V, ch1, V in each corner space* repeat 3 more
times. Fasten off (28 V’s) CC
Rnd 7) Repeat round 5, ending with 36 clusters.
MC
Rnd 8)
Repeat round 6, ending with 40 V’s
CC
Rnd 9) Repeat round 5, ending with
48 Clusters.
MC
Rnd 10)
Repeat round 6, ending with 52 V’s fasten off and weave in ends.Friday, May 10, 2013

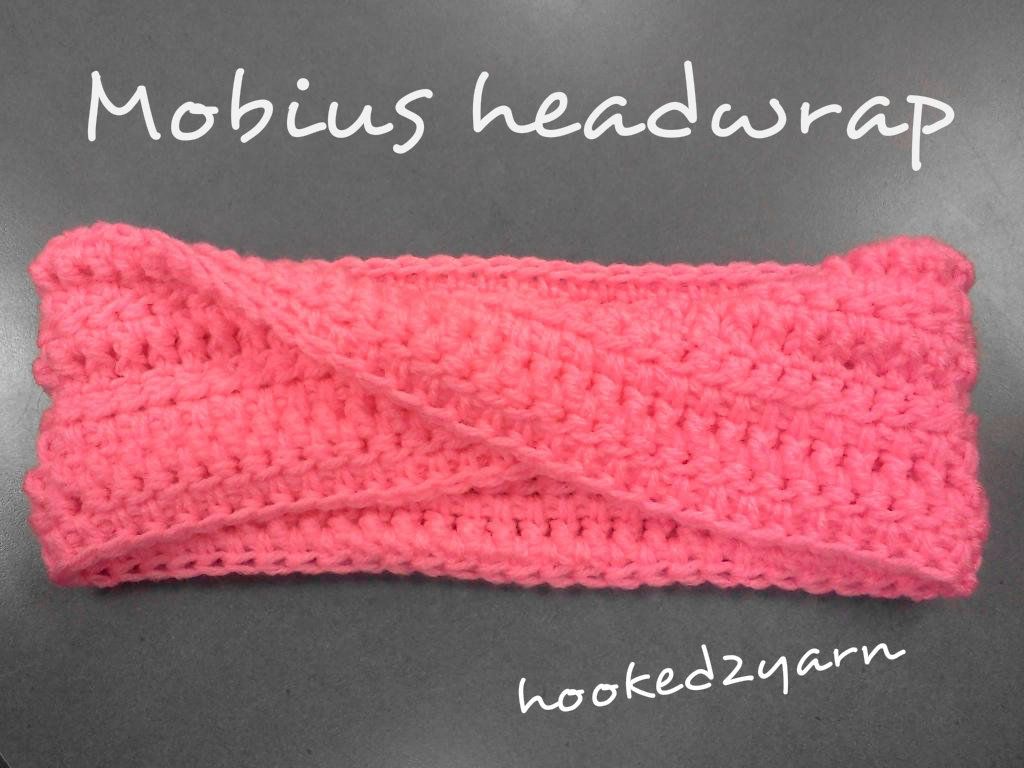
Mobius Headwrap
Stitches to know-
Hdc-half double crochet
FPDC-front post double crochet BPDC-back post double crochet
LHdc-Long half double crochet
I used Red Hart WW yarn with an I hook
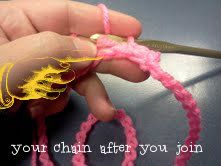
Ch 60 and join
Row 1) Turn chain slightly so the "bump" of the chain
is showing ontop, ch1, Hdc in each bump of the chain. Do not join. (see photo
below)
When you get to the top of the hdc, you will turn it
toward you 180 degrees so the first hdc is upside-down and work hdc in each
chain on the reverse side. (This will put the natural twist in the
headwrap).
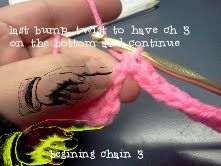
Row 2) Ch 2, FPDC (YO, insert hook in on right
side of previous hdc around to the left side of hdc -your hook should be
"behind" the hdc stitch- YO, pull through 2 loops, YO pull through last 2
loops). FPDC around each hdc until you reach the ch2, then join.
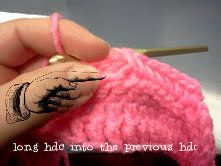
Row 3) Turn work, ch2, Lhdc (YO, insert hook in top
of previous hdc, YO and pull through all 3 loops). Lhdc in each stitch around
and join beg ch 2.
Row 4-7) repeat rows 2 & 3.
I do give permission make and sell what you make as
long as you give me credit for the pattern. Thank you, Alicia from Hooked2yarn
@2013
Infinity Shell
Infinity Shell

By Hooked2yarn
Stitches to know
Slip stitch
DC-double crochet
Sc- single crochet
Shell -5dc in same stitch
Sm V- sc, ch2, sc in same stitch
The above infinity scarf was used with Hobby Lobby’s I Love This yarn and an “I” hook. I can comfortably wrap this around my neck twice.
Ch 155, join to the first chain being careful not to twist.
Rnd 1- Ch 3 (this counts as first DC), 4dc in same stitch, skip next 3 chains, Sm V (sc, ch2 sc in same stitch), skip next 3 chains, *shell (5 dc in same stitch), skip next 3 chains, Sm V, skip next 3 chains, * repeat *to *. Join with slip stitch to top of starting chain 3.
Rnd 2-Slip stitch in next 2 dc. Chain 3 (this counts as sc, ch 3 of sm v) sc in same stitch, *Shell in chain 2 of previous sm V, Sm V in 3rd dc of previous shell*. Repeat from * to *. Join with slipstitch in ch2.
Rnd 3- Chain 3, 4dc in same stitch, Sm V in 3rd dc of previous shell, *Shell in ch 2 space, Sm v in 3rd dc of previous shell *. Repeat from *to *. Join with slip stitch to top of chain 3.
Rnd 4, repeat rows 2 & 3 to desired width.
*feel free to make and you wish, however I would appreciate it if I was given the credit for having written the pattern
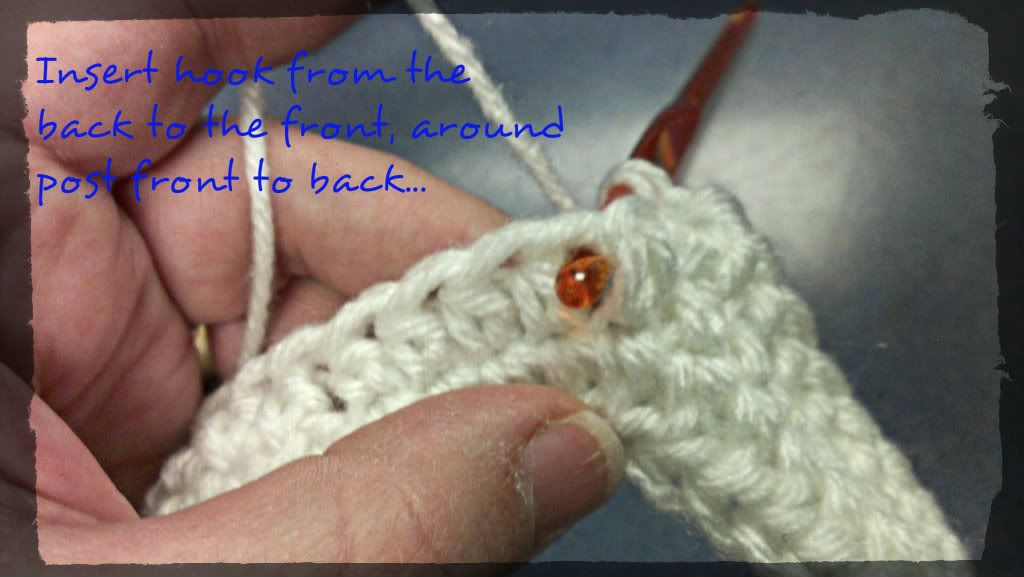
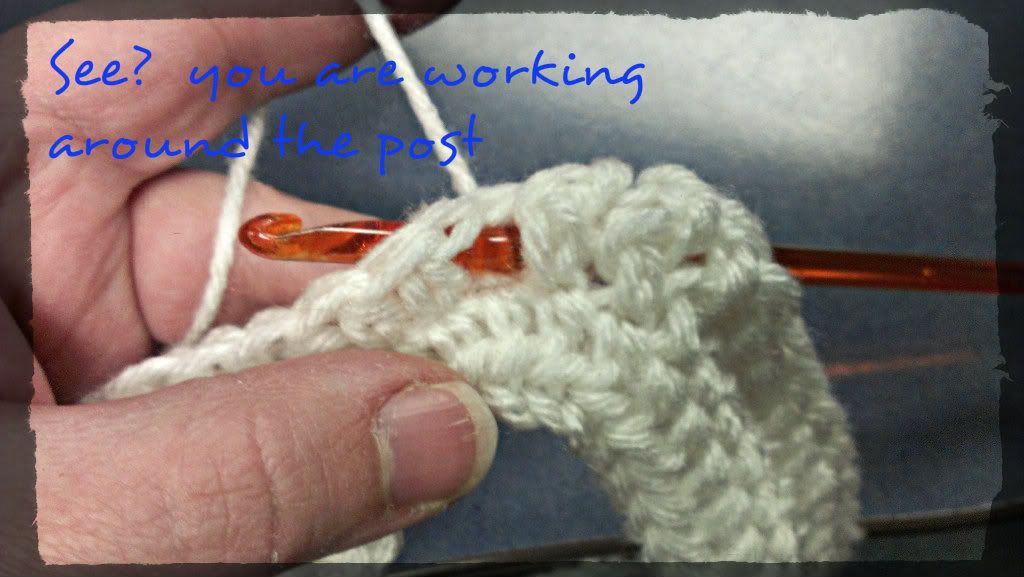
How to Front Post Double Crochet
Front Post Double Crochet
I am hoping these instructions help understand FPDC a little bit. Please excuse the dry hands, apparently I need lotion, haha. Notice how the stitch goes “around the post” of the previous stitch?
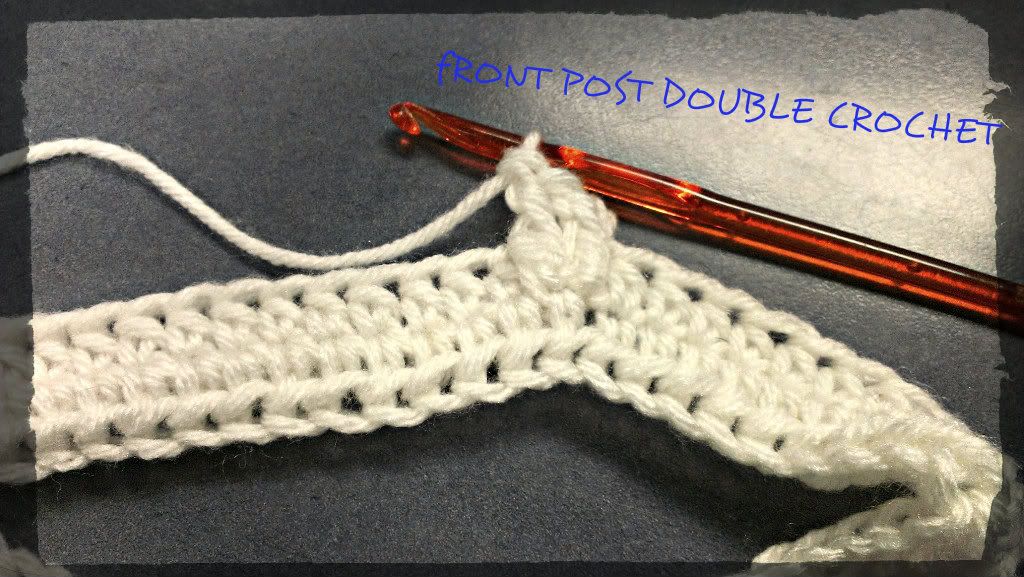
To do this we are going to insert the hook in the gap next to the stitch you are going to go around. Insert the hook from the front, go to the back, make hook come back out to the front on the left side of the stitch

Once the hook is through on the front side complete like a double crochet, YO pull hook through and out the right side. YO pull through 2 loops, YO pull through last 2 loops.
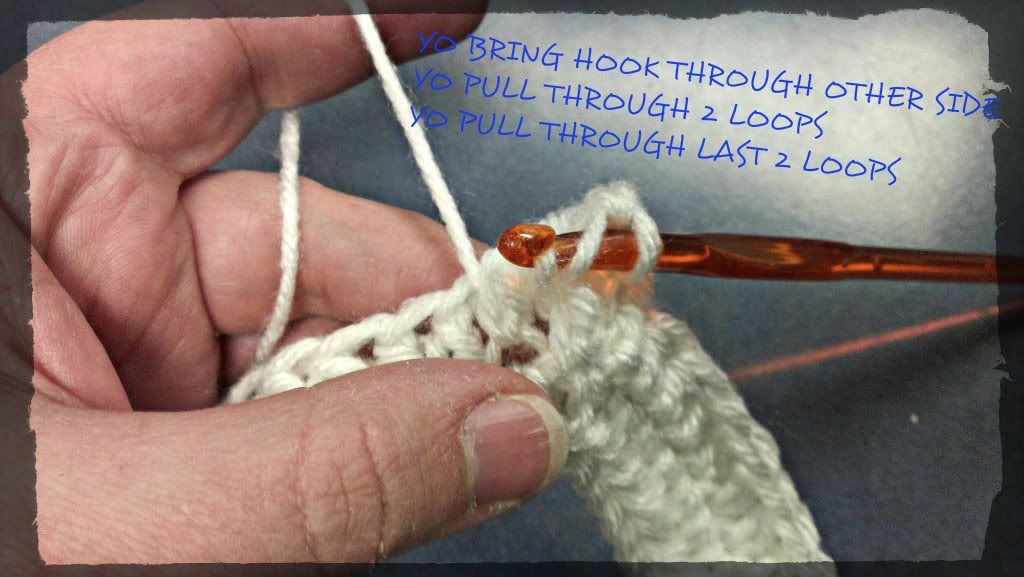
Good luck~Hooked2yarn
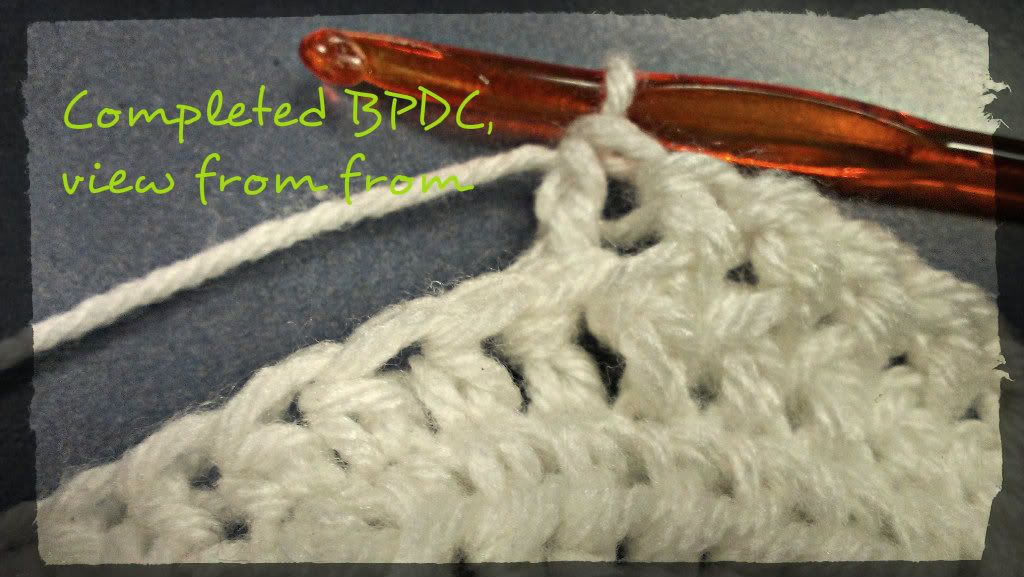
How to Back Post Double Crochet
Back Post Double Crochet=BPDC
Insert hook from the back side (inbetween stitches)
around the front to the left side of the stitch.
YO, pull through, YO, pull through 2 loops, YO pull
through last to loops. Below is what the stitch looks like
completed.
How to Long half double crochet
Long half double crochet = Lhdc
This Lhdc is called so because you are doing a hd in
the stitch below the row you would normally do the hdc in. This yarn was kinda
hard to see but when working the moebius headwrap on row 3 you see the top
stitches from the FPDC, you will insert hook in that go completely through both
sides and finish the hdc.
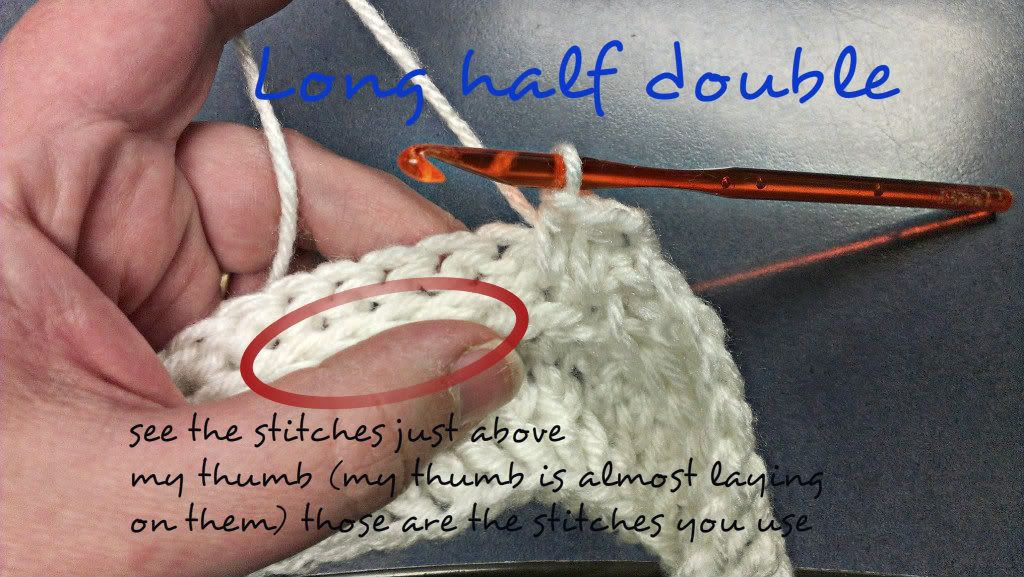
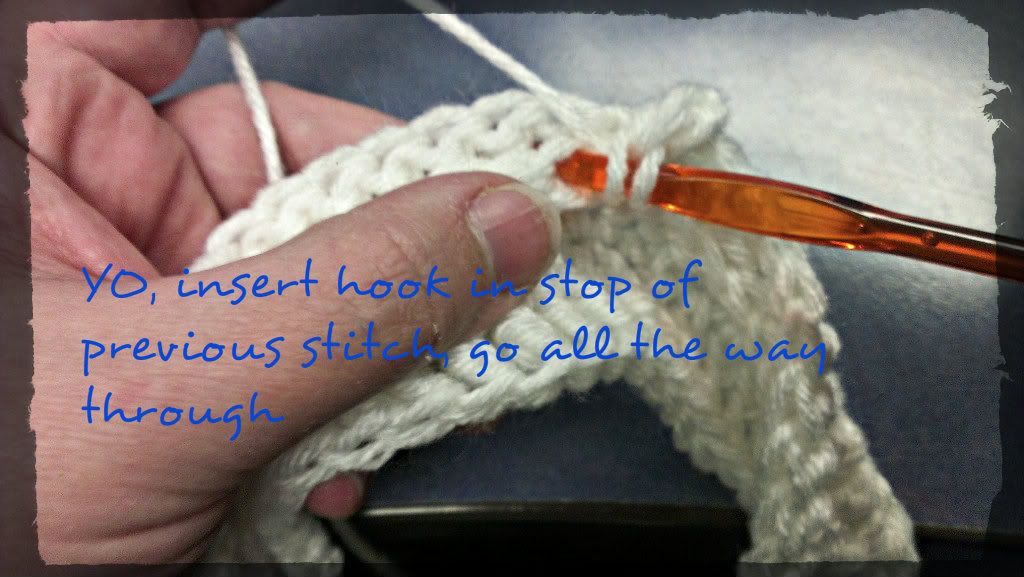
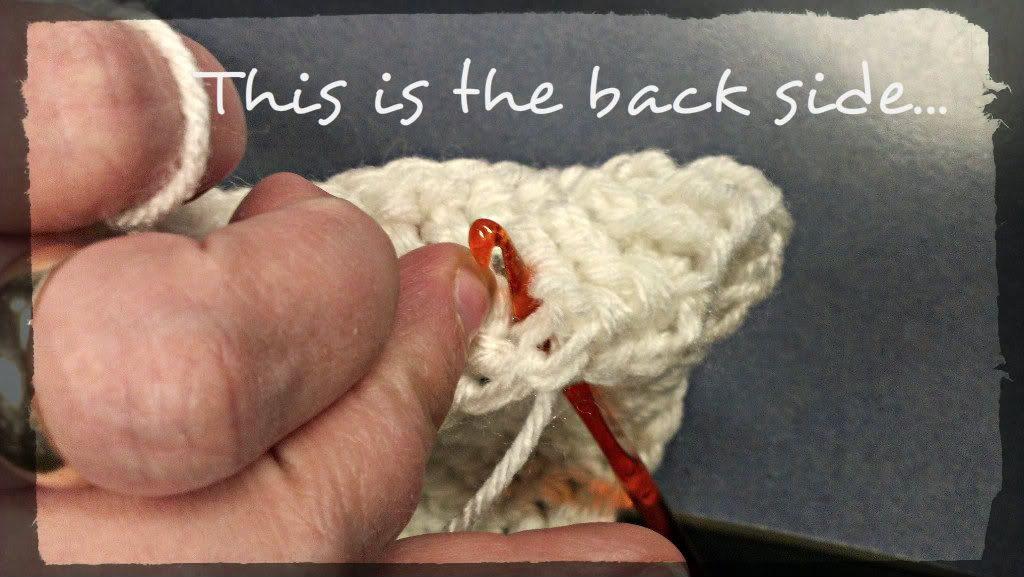
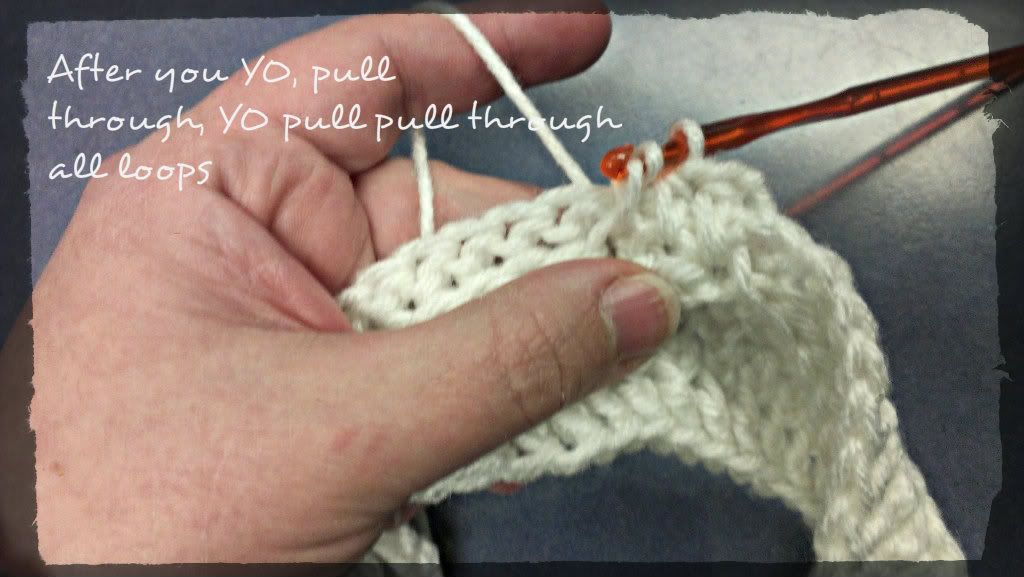
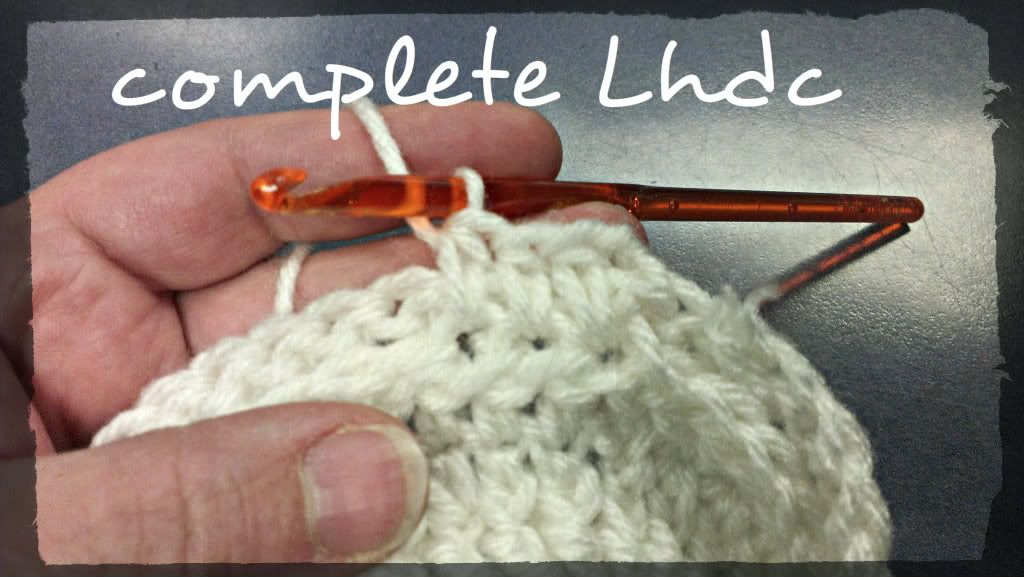
I hope this made some sense.
So far Ive not been very good at blogging. I dont have a computer at home because internet service is not offered where I live unless I want to spend LOTS of $$. Right now I have things that are alittle more important such as a husband and 1 teenage and 1 preteen daughters at home. I do have a webs account which is www.hooked2yarn.webs.com You are more than welcom to go overthere and see what I have until I get this figured out, up and going. With that being said any helpful hints would be very appriciated.
Im hoping to use this blog for sharing my creativity and family. Please feel free to skip through or comment on what ever you see. I look forward to talking to you soon.
Alicia
Im hoping to use this blog for sharing my creativity and family. Please feel free to skip through or comment on what ever you see. I look forward to talking to you soon.
Alicia
Subscribe to:
Posts (Atom)